This post may contain affiliate links which won’t change your price but will share a commission.
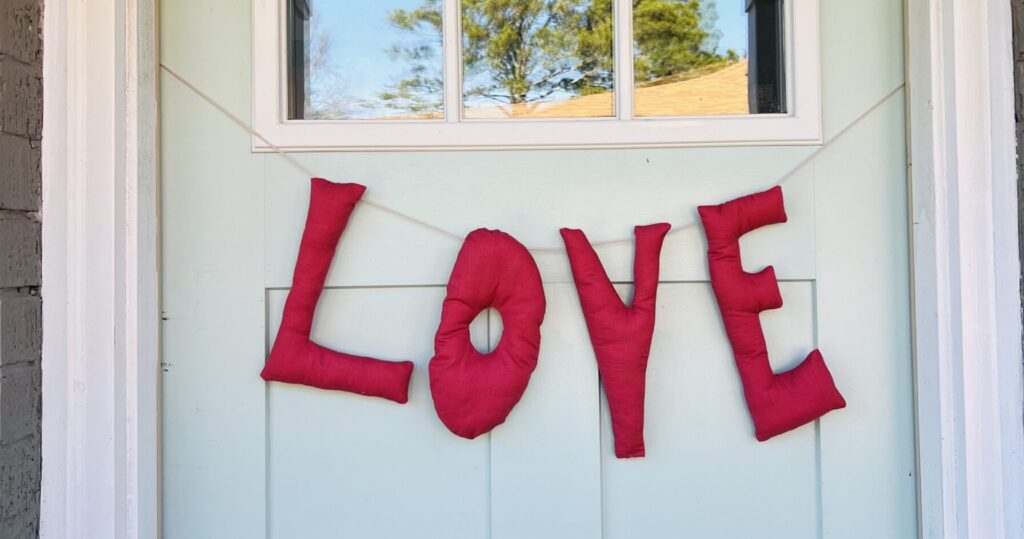
Looking for a sweet and simple banner to display your love for others? Whether for Valentines Day, a romantic date night, or for your child’s room, this banner is sure to make a statement.
My family and I moved into our first house as a family a few months ago. Once settled, I quickly discovered my strong desire to decorate the house for each season. While I’m not usually one to go all out with decor, I do enjoy adding touches to make the home feel warm and inviting.
Christmas was certainly a fun time for decorating, but now that it’s the new year and Christmas decor is tucked away until next season, I found myself searching for a pick-me-up to add cheer back to the house. I thought ahead to Valentine’s Day and how it is quickly approaching! Realizing I didn’t have any decor for the holiday, I rummaged around in my fabric stash and found pink cotton fabric I picked up from a thrift store (my favorite place to find quality fabrics for amazing prices) for $3. I pondered what I could make that would be a quick and easy project. I decided on this L O V E banner. I am so happy with the way it turned out and the cheer it has brought back to the home after the Christmas season. I have even received several compliments!
Follow along below to see how you can design and create one yourself-
MATERIALS
- Sewing Machine (not required) (amazon)
- Iron (amazon)
- Marking Utensil (amazon)
- Needle and Thread (amazon)
- Fabric of your Choosing– The amount of fabric needed will depend on what size banner you wish to make (amazon)
- Scissors (amazon)
- Pins (amazon)
- Polyfil (amazon)
- Yarn or Thread for Hanging Banner (amazon)
HOW TO CREATE
Step One: Gather all materials needed for the project.
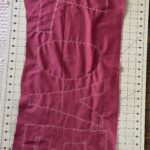
Step Two: Iron the fabric so that it is without wrinkles. Fold fabric in half making sure both corners match.
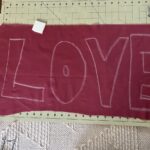
Step Three: Once folded, use a marking tool to draw the letters onto the fabric. You could also use a template that has been printed out and pinned on to the fabric if you do not wish to free-hand. Make sure to leave enough space between each letter for seam allowance purposes.
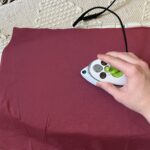
Step Four: Either use the sewing machine (very fast option) or needle and thread to sew around the sketched letters. Leave a small section (approximately 1-1.5 in wide) without stitches. This section is used for turning the letters right side out once finished sewing. For the “O” do not sew any of the inner section.
Step Five: Once you have finished sewing, use scissors to cut out the letters. Leave at least 1/4in seam allowance.
Step Six: For the “O” cut out small triangular notches around the circumference of the letter, being careful not to cut through the stitches. For the other letters, cut small diagonal lines at each corner being careful not to cut through the stitches. Cutting out these areas helps to ensure the letters will lie flat and turn out properly.
Step Seven: Flip each letter right side out. Once flipped, press each letter using the iron.
Step Eight: Fill each letter with Poly-fil and use pins to hold the openings closed making sure to fold the seam allowances of the openings inward.
Step Nine: With the seam allowances folded inward, use an invisible stitch to close the openings (see notes section for a link to instructions for hand stitching a ladder invisible stitch).
Step Ten: String each letter onto the thread you have chosen for displaying the banner.
You have completed the L O V E banner! Find a cute spot to display it and enjoy your hard work!
Fabric L O V E Banner
How to create a simple & cute fabric LOVE banner.
- Sewing Machine
- Pair of Scissors
- Needle & Thread
- Iron
- Marking Utensil
- Pins
- Fabric (Any color you’d like. The amount of fabric needed will depend on the size banner you wish to create. The size of fabric I used was 1 yard long and 0.5 yard wide.)
- Poly-fil Stuffing (The amount needed will depend on the size banner you wish to create.)
- Thick Thread (This is used for hanging the banner.)
-
Gather all materials needed for the project.
-
Iron the fabric so that it is without wrinkles. Fold fabric in half so that the corners match.
-
Once folded, use a marking tool to draw your letters onto the fabric. You could also use a template that has been printed out and pinned on if you do not feel comfortable free-handing the letters. Make sure to leave enough space between each letter for seam allowance purposes.
-
Either use the sewing machine (very fast option) or your needle and thread to sew around your sketched letters. Make sure to leave a section without stitches. This section needs to be wide enough for the letter to be turned inside out. For the “O” do not sew any of the inner section.

-
Once you have finished sewing, use scissors to cut out the letters. Leave at least 1/4in seam allowance.
-
For the “O” cut small triangular slits around the circumference of the letter being careful to not cut through the stitches. For the other letters, cut a diagonal line at each corner being careful to not cut through the stitches.

-
Flip each letter right side out. Once finished, iron each letter.
-
Fill each letter with Poly-fil and use pins to hold the openings closed making sure to fold the seam allowances inward.

-
With the seam allowance folded inward, use an invisible stitch to close the openings (see notes section for a link to instructions for hand stitching a ladder invisible stitch).
-
Pick your banner thread and use a needle to thread each letter onto the thread.
-
Now you are ready to display your love for all to see!